
 Pin
Pin
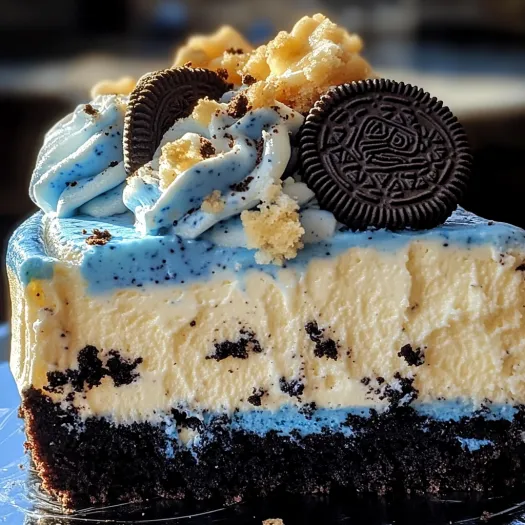
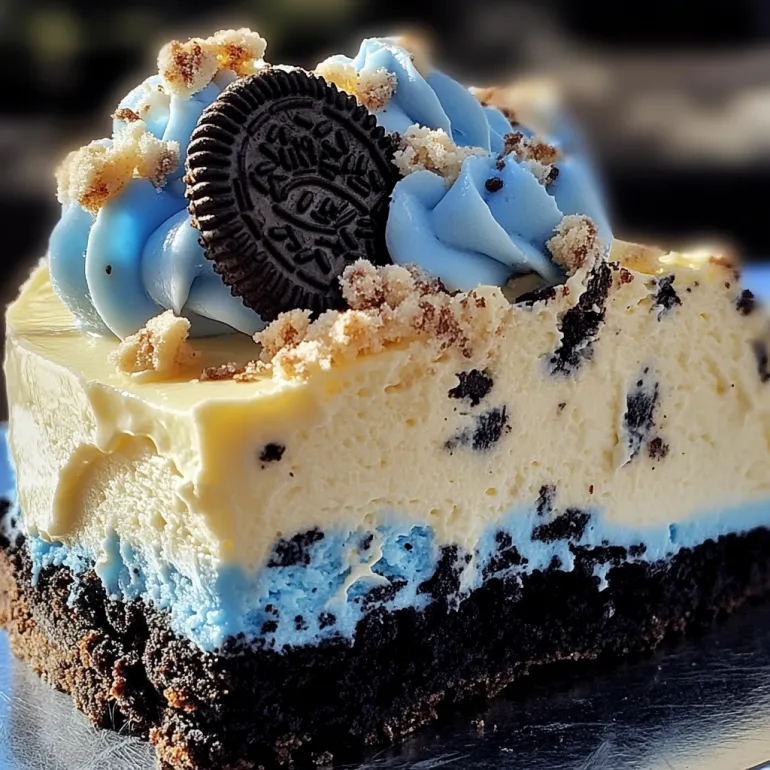
This Blue Velvet Oreo Cheesecake transforms ordinary gatherings into spectacular events with its stunning appearance and heavenly flavor combination. The vibrant blue filling nestled between layers of Oreo crust creates a dessert that's both visually stunning and incredibly delicious.
I first created this blue velvet masterpiece for my sister's baby shower and everyone was absolutely mesmerized. The guests kept asking if it came from a professional bakery and couldn't believe I had made it myself. Now it's requested for every family celebration.
Ingredients
For the Crust
- Oreo cookies: with filling included provide the perfect chocolate base and eliminate the need for added sugar
- Unsalted butter: binds the crumbs together while adding richness look for European style butter for extra creaminess
For the Cheesecake Filling
- Cream cheese: creates that signature tangy cheesecake flavor choose full fat blocks not whipped or spreadable varieties
- Granulated sugar: balances the tanginess without making it overly sweet
- Unsweetened cocoa powder: gives subtle chocolate flavor that enhances the blue color
- Large eggs: provide structure and richness allow them to come to room temperature first
- Sour cream: adds moisture and a subtle tang that rounds out the flavor
- Heavy cream: creates a silky smooth texture and richer mouthfeel
- Vanilla extract: enhances all other flavors use pure not imitation for best results
- White vinegar: intensifies the blue color and helps maintain it during baking
- Blue food coloring: transforms this into something magical gel colors provide more vibrant results
For the Topping
- Heavy whipping cream: whipped to perfection adds a light cloud like finish
- Powdered sugar: stabilizes the whipped cream so it holds its shape longer
- Crushed Oreo cookies: bring texture and visual contrast to the finished dessert
Step-by-Step Instructions
Prepare the Foundation
- Step:
- Start with room temperature ingredients for the smoothest filling. Set your cream cheese out for at least 2 hours before beginning and make sure eggs have lost their chill. This ensures your cheesecake will have that professional smooth texture without lumps.
Create the Cookie Base
- Step:
- Process those Oreos until they become fine consistent crumbs that will hold together nicely. Pour in melted butter gradually while pulsing until the mixture resembles wet sand. Press firmly into the pan using the bottom of a measuring cup to create an even compact layer that won't crumble when sliced.
Craft the Perfect Filling
- Step:
- Beat the cream cheese slowly at first then increase speed until absolutely smooth and creamy. This is crucial for avoiding lumps. Incorporate sugar and cocoa powder gradually not all at once. Add eggs individually allowing each to fully integrate before adding the next. The batter will become increasingly smooth and glossy. When adding blue coloring start with a small amount and gradually increase until you achieve your desired shade.
Master the Water Bath
- Step:
- Double wrap your springform pan with heavy duty foil reaching up the sides to prevent any water seepage. Place in a larger pan and add hot water halfway up the sides of the cheesecake pan. This gentle cooking method prevents cracks and ensures even baking throughout.
Perfect Baking Technique
- Step:
- Look for slight jiggling in the center when done not complete firmness. The edges should be just set and slightly pulling away from the pan. Turn off the oven when finished but leave the door cracked open with the cheesecake inside for 30 minutes to prevent sudden temperature changes that cause cracks.
The first time I served this cheesecake my niece gasped and asked if it was made by mermaids. Something about the ethereal blue color against the dark Oreo crust does have a magical quality. That moment cemented this recipe as our official celebration dessert.
Storage Guide
Properly stored this cheesecake maintains its quality for up to 5 days in the refrigerator. Keep it in the springform pan until ready to serve then transfer any leftovers to an airtight container. The crust may soften slightly after day three but the flavor actually improves as it sits.
For longer storage freeze individual slices wrapped in plastic wrap then aluminum foil. They will keep for up to 2 months. Thaw overnight in the refrigerator never at room temperature which can make the texture grainy.
Smart Substitutions
For a gluten free version replace Oreos with gluten free chocolate cookies and add 1 tablespoon more butter to compensate for their drier texture. The filling is naturally gluten free as written.
If you prefer a different color palette simply replace the blue food coloring with another shade. Red creates a stunning red velvet variation while purple makes an enchanting galaxy themed dessert.
Dairy free adaptations work surprisingly well with plant based cream cheese and coconut cream standing in for the dairy components. The texture will be slightly different but still delicious.
Troubleshooting Tips
If cracks form despite your careful preparation simply cover them with the whipped cream topping. No one will ever know. For preventing cracks always use room temperature ingredients and avoid overmixing after adding eggs.
If your cheesecake seems undercooked after the specified time resist the urge to increase the oven temperature. Instead extend baking time in 5 minute increments until the edges are set with a slight jiggle in the center.
 Pin
Pin
 Pin
Pin
Frequently Asked Questions About the Recipe
- → How do I get the perfect blue color for this cheesecake?
For the best vibrant blue color, use gel food coloring rather than liquid. Gel colors are more concentrated and won't thin your batter. Start with a small amount and gradually add more until you achieve your desired shade of blue. Remember that the color will deepen slightly during baking.
- → Can I make this cheesecake without a water bath?
While you can skip the water bath, it's highly recommended for achieving the creamiest texture and preventing cracks. The water bath provides gentle, even heat distribution. If you must skip it, bake at a slightly lower temperature (315°F) and place a pan of water on the rack below the cheesecake to add moisture to the oven.
- → How far in advance can I make this cheesecake?
This cheesecake can be made up to 3 days in advance and stored in the refrigerator. For best results, add the whipped cream topping and Oreo crumbles just before serving. You can also freeze the baked and cooled cheesecake (without toppings) for up to 2 months - just thaw overnight in the refrigerator before decorating.
- → Why is there vinegar in the filling?
The small amount of vinegar helps enhance and stabilize the blue color by reacting with the cocoa powder. It also adds a subtle tanginess that balances the sweetness. The vinegar taste completely disappears during baking, so don't worry about it affecting the flavor.
- → Can I substitute the Oreos with other cookies?
Yes! While Oreos create the classic contrast with the blue filling, you can substitute with other chocolate sandwich cookies, chocolate graham crackers, or even chocolate wafer cookies. For a different flavor profile, try chocolate mint cookies or chocolate peanut butter sandwich cookies.
- → What's the best way to cut clean slices of cheesecake?
For picture-perfect slices, dip a sharp knife in hot water and wipe it clean between each cut. The heat helps the knife glide through the dense filling without dragging or creating crumbs. Chilling the cheesecake thoroughly (at least 6 hours) also helps achieve cleaner cuts.