
 Pin
Pin
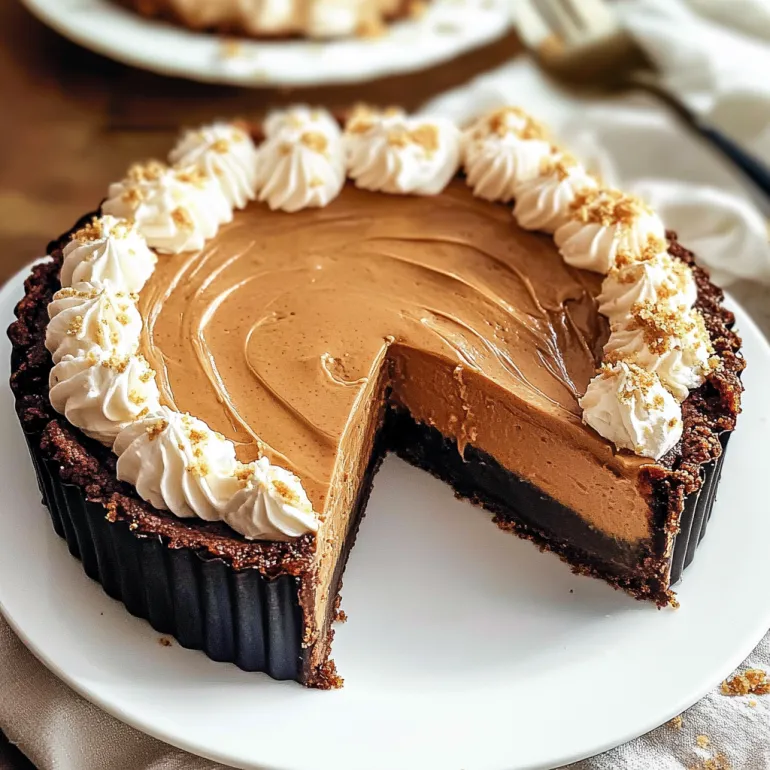
This ultra-creamy peanut butter pie is the dessert I pull out when I need a guaranteed crowd-pleaser but do not want to turn on the oven. With a chocolate Oreo crust and a whipped filling, it is a dessert that feels nostalgic and decadent at the same time.
The first time I brought this pie to a summer potluck, it vanished before I could grab a second slice. It has become my standby for family birthdays and easy entertaining ever since.
Ingredients
- Oreo cookies: These provide the perfect chocolatey base with crunch Choose classic Oreos and pulse them finely for an even crust
- Melted butter: Helps the crust set and adds richness Use real butter for the best flavor
- Fine sea salt: Enhances the chocolate and breaks up the sweetness Look for pure sea salt without additives
- Heavy cream: Whips into a billowy topping that makes the filling so airy
- Low-fat cream cheese: Allows the pie to set while keeping it lighter Choose a block style for best texture
- Natural peanut butter: Adds deep peanut flavor Use the smooth and well-stirred variety for a creamy filling
- Vanilla extract: Warms up the flavors Aim for pure vanilla if possible
- Powdered sugar: Sweetens the filling and keeps it fluffy Sift if clumpy for best results
- Optional toppings: Whipped cream chocolate shavings crushed Oreos or chopped peanut butter candies all add fun and flair Pick your favorites and mix it up each time
Step-by-Step Instructions
- Prep the Pie Plate:
- Lightly grease a nine-inch pie plate with a thin layer of cooking spray to ensure an easy release when serving
- Make the Oreo Crust:
- Pulse twenty-four Oreo cookies in a food processor until they are the texture of coarse sand Add melted butter and a pinch of sea salt then pulse again to combine Press this crumb mixture evenly across the bottom and up the sides of your prepared pie plate Use a measuring cup to compact the crust really well and freeze the crust while you prepare the filling
- Whip the Cream:
- Pour cold heavy cream into the bowl of a stand mixer With the whisk attachment beat on medium-high speed for several minutes until stiff peaks hold their shape Move the whipped cream to a separate bowl and set aside
- Mix the Filling:
- In the same mixer bowl with a paddle attachment beat softened cream cheese natural peanut butter vanilla and sea salt until the mixture is completely smooth and fluffy This can take about two minutes Slowly add powdered sugar then mix on low speed until just incorporated
- Fold in the Whipped Cream:
- Gently beat in one cup of the whipped cream on low speed Once that is mostly combined use a spatula to carefully fold in the rest by hand Stop folding when just a few white streaks remain to keep the filling light
- Fill and Chill the Pie:
- Spoon the filling into your chilled Oreo crust Smooth the top with a spatula and create decorative swirls if you like Refrigerate uncovered for at least four hours or until completely set and sliceable
- Serve:
- Once firm cut the pie into slices Add whipped cream chocolate shavings or any toppings you like Serve cold and enjoy every creamy bite
 Pin
Pin
I always look forward to adding extra chocolate shavings on top My sister once requested it as her birthday cake and now it is a family tradition to allow the guest of honor to decorate it with their favorite candies
Storage Tips
This pie keeps well covered in the refrigerator for up to four days For longer storage place the pie in the freezer and thaw in the fridge before slicing The crust stays crisp for about two days then softens slightly but is still delicious
Ingredient Substitutions
Swap low-fat cream cheese for full-fat if you prefer a richer pie Crunchy peanut butter gives texture if that is your style Gluten-free chocolate sandwich cookies work well for a gluten-sensitive crowd
Serving Suggestions
Pile on whipped cream and sprinkle on chopped peanuts to play up the nutty side Pair with a scoop of vanilla ice cream for the ultimate summer barbecue dessert It also makes a fun birthday alternative topped with candle-holding peanut butter cups
 Pin
Pin
Peanut Butter Pie Origins
This pie has roots in classic American diner fare and Southern kitchens where peanut butter desserts are always in style Over time the addition of Oreos and cream cheese made it extra indulgent Modern versions like this are now popular no-bake treats
Frequently Asked Questions About the Recipe
- → Can I use regular peanut butter instead of natural?
Natural peanut butter is best for texture and flavor, but you can use regular peanut butter if that's what you have. Just note that some varieties are sweeter and saltier.
- → Should the pie be kept refrigerated?
Yes, this pie should be chilled for several hours before serving and stored in the refrigerator until eaten to maintain its structure.
- → What toppings work well?
Try whipped cream, chocolate shavings, crumbled Oreos, or chopped peanut butter cups for an extra treat on each slice.
- → Is it possible to make this in advance?
Absolutely! You can prepare the pie a day ahead. Keep it covered and chilled until serving time for best results.
- → Can I use a store-bought crust?
A store-bought chocolate crust offers a convenient shortcut, though making your own with cookies gives a fresher, crunchier base.
- → What if I don’t own a stand mixer?
A hand mixer or even a whisk can work for whipping the cream and blending the filling, though it may take a few extra minutes by hand.